
How to Sharpen a Damascus Knife Without Scratching the Pattern
Quick Answer
Learn the correct technique for sharpening Damascus steel knives using whetstones, the right angles, and how to protect the layered pattern throughout the process.
Damascus steel is famous for its wavy, flowing patterns, layers of high-carbon and low-carbon steel folded hundreds of times to create a blade that is both beautiful and functional. But that beauty creates a question most knife owners have: can I sharpen it myself, and will sharpening destroy the pattern?
The answer is yes, and no. You can absolutely sharpen a Damascus knife at home, and done correctly, sharpening the edge will never touch the pattern. This guide covers the right tools, the right technique, and what to avoid if you want to keep your blade looking as good as it performs.
If you are looking at a Louis Martin Damascus knife for the first time, or you already own one and want to keep it in top shape, this is the complete approach.
Why Damascus Steel Requires Different Sharpening
Standard kitchen knives, European-style stainless blades at 20–22° per side, are fairly forgiving. You can run them through a pull-through sharpener and get a functional edge. Damascus steel is different in two important ways:
1. The geometry is more acute. Most Damascus and Japanese knives are ground at 10–15° per side, not 20–22°. A fixed-angle electric sharpener will grind that edge at the wrong angle, destroying the original geometry and forcing you to reprofile from scratch.
2. The pattern is an acid-etched surface feature. After forging and grinding, Damascus blades are etched in a mild acid (typically ferric chloride) to reveal the contrast between the iron-rich and carbon-rich layers. This creates the visible pattern. That etched surface is on the flat of the blade, not the edge. Any abrasion on the flat erases the pattern.
The good news: sharpening the edge bevel never touches the flat. As long as you work only the edge, the pattern is completely safe.
For more context on how Damascus is made and why the steel behaves the way it does, see our guide on Damascus knives: everything you need to know and our overview of types of steel used in handmade knives.
Choosing the Right Sharpening Tool

Whetstones (Best Choice)
A whetstone, also called a water stone or sharpening stone, is the correct tool for Damascus steel. It gives you full control over angle and pressure, removes minimal steel per pass, and introduces no heat into the blade. Use a progression of grits:
- 400–600 grit, for a chipped edge or full reprofile
- 1000–1200 grit, standard sharpening session
- 3000–6000 grit, edge refinement and polishing
- Leather strop with compound, final deburring and edge alignment
Quality combination stones (1000/6000 or 1000/3000) work well for maintenance sharpening. If you own multiple Louis Martin Damascus knives or a chef’s knife you use daily, investing in a full progression is worth it.
Ceramic Honing Rod (Maintenance)
A smooth ceramic honing rod is safe for Damascus between sharpening sessions. It realigns the edge without removing steel. Use it before every few uses to extend the time between full whetstone sharpenings. Note: use a smooth ceramic rod only, ridged or grooved rods act like files and will scratch the blade surface.
Diamond Plates (Use Carefully)
Diamond plates cut faster than whetstones and are useful for removing chips or reprofiling a badly damaged edge. The tradeoff is aggression, they remove more steel per stroke and can overheat the blade if you press too hard. If you use a diamond plate, always follow with a full whetstone progression before finishing.
Electric Sharpeners (Avoid)
Do not use electric pull-through sharpeners on Damascus. The fixed angle is wrong for most Damascus geometry, the abrasive wheels scratch the patterned surface of the blade, and the friction generates heat that can soften the high-carbon layers. One pass can cost years of service life.
The Correct Sharpening Angle
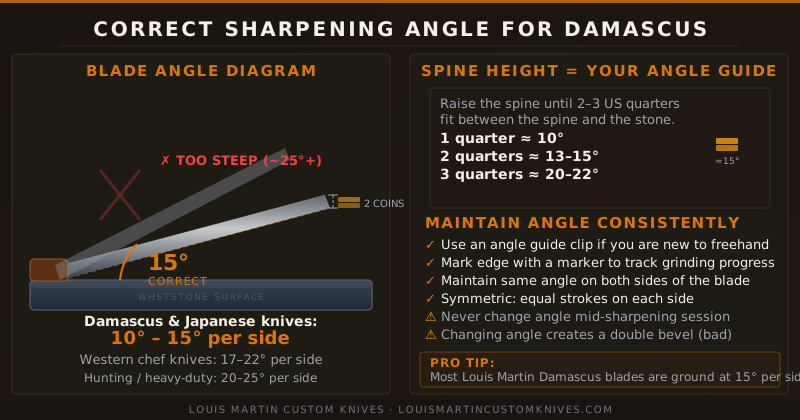
Most Damascus and Japanese-influenced knives are sharpened at 10–15° per side. All Louis Martin Custom Knives Damascus blades are ground at 15° per side from the factory.
The Two-Quarter Method
If you do not have an angle guide clip, use this simple gauge:
- Lay the knife flat on the whetstone with the blade edge touching the stone.
- Stack two US quarters under the spine of the blade.
- That height brings the spine to approximately 13–15° from the stone, the correct range for Damascus.
One quarter gives you roughly 10°. Three quarters brings you to 20–22°, which is correct for heavier hunting or Western-style blades. For a hunting knife with a more robust edge, 20° per side is appropriate.
Consistency Matters More Than Perfection
An edge sharpened at a consistent 16° is better than one that wavers between 12° and 20°. Changing angle mid-session creates a double bevel, two overlapping bevels at different angles, which cannot cut cleanly. Mark the edge with a permanent marker before you start. After a few strokes, the marker on the bevel should be evenly worn away. If only the tip of the bevel is bright, your angle is too steep. If only the shoulder is worn, it is too shallow.
Step-by-Step: Sharpening on a Whetstone

Step 1: Soak and Prepare the Stone
Submerge a water stone in water for 5–10 minutes before use. The water floats the metal particles (swarf) off the stone surface, preventing them from clogging the pores. Keep a small spray bottle of water nearby to re-wet the stone throughout the session. Oil stones use honing oil instead of water, never mix the two.
Step 2: Set the Angle
Place the stone on a non-slip surface (a damp towel works). Set your two-quarter height at the spine. Hold the handle with your dominant hand and place two or three fingertips on the flat of the blade near the edge. Your fingertips are your angle guide, maintain the same pressure and angle from heel to tip on every stroke.
Step 3: Sharpen
Stroke edge-first across the stone, moving from heel to tip in a single sweep. Apply light-to-medium pressure on the forward stroke; lift on the return. Start with a 10/10 alternating pattern (10 strokes per side), then reduce to 5/5, then 3/3, then 1/1 as you feel the edge develop. The pattern should stay consistent throughout, always edge-first, always the same angle.
You will feel a slight burr forming on the opposite side of the blade. This is the metal folding over as the edge thins. Once the burr runs the full length of the blade on one side, switch sides.
Step 4: Deburr and Strop
Once the edge is sharpened, the burr must be removed. A leather strop is the best tool, it aligns the final edge without removing additional steel. Strop spine-first (opposite of sharpening direction) with light pressure, alternating sides, 10–15 passes per side. Finish with the paper test: the knife should slice cleanly through a sheet of printer paper with no tearing.
Protecting the Damascus Pattern
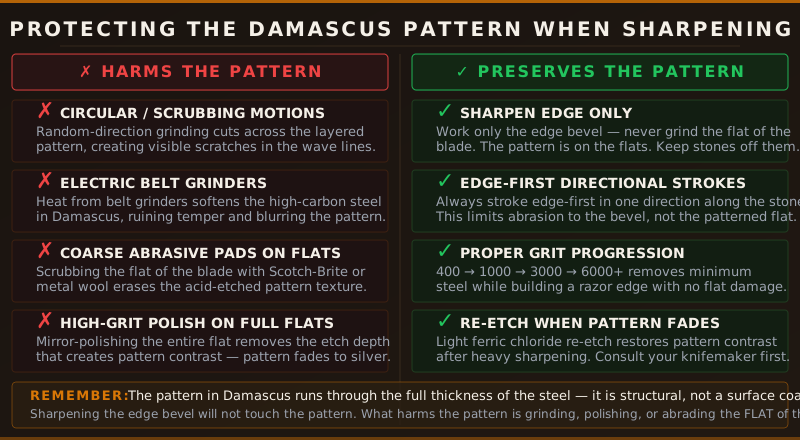
The Damascus pattern survives sharpening easily, as long as you keep the stone on the edge bevel and never drag it across the flat of the blade.
What Harms the Pattern
- Circular scrubbing motions, random-direction grinding cuts across the layered wave lines, creating visible scratches
- Belt grinders, heat and speed remove the etched surface and blur the pattern
- Abrasive pads on the flats, Scotch-Brite, metal wool, or coarse sandpaper on the flat erases the acid-etch contrast
- High-grit polishing of the full flat, mirror-polishing removes the depth that creates pattern contrast; the pattern fades to plain silver steel
What Preserves the Pattern
- Sharpening edge-only, your stone never touches the flat if your angle is correct
- Edge-first directional strokes, this confines abrasion to the bevel, not the patterned surface
- Proper grit progression, fine finishing minimizes the width of the bevel scratch zone
- Re-etching when the pattern fades, after years of heavy use and many sharpening sessions, ferric chloride applied briefly to the flat will restore the pattern contrast; consult your knifemaker or see our knife care guide before attempting this
Proper storage between uses also protects the pattern. Review the full how to store knives safely guide for the correct storage methods for Damascus specifically.
After Sharpening: Oil the Blade
The high-carbon layers in Damascus steel are reactive. After sharpening, the newly exposed steel on the edge is particularly vulnerable to oxidation. Apply a thin coat of food-safe mineral oil or camellia oil along the entire blade immediately after sharpening and stropping.
This is part of the same care routine covered in our how to clean and oil a Damascus knife guide. Read it alongside this one for a complete maintenance picture.
When to Sharpen vs. When to Hone
Use the paper test to decide:
- If the knife slices cleanly through printer paper, it is sharp enough. Hone with the ceramic rod if it feels slightly off.
- If the knife tears or pushes through the paper rather than slicing, it is time to sharpen on the whetstone.
Frequent honing extends the time between sharpenings significantly. A Damascus kitchen knife used daily should be honed before every few uses and whetstone-sharpened two to four times per year under normal conditions. A hunting knife used occasionally may only need a full whetstone session once or twice a year.
Get a Knife Worth Sharpening
The techniques in this guide are designed for high-quality Damascus steel, blades where the pattern is real, the steel is properly heat-treated, and the edge geometry is worth maintaining. All Louis Martin Custom Knives are hand-forged from genuine Damascus billets and finished to a 15° edge per side, ready for the maintenance routine described here.
If you are a retailer or knife shop interested in carrying handmade Damascus blades, our wholesale program offers competitive pricing on the full knife line. See the knife steel guide for technical specifications on the steel types used in each collection.
Sharpening a Damascus knife is not harder than sharpening any other premium blade, it just requires the right tool (a whetstone), the right angle (15° per side), and the discipline to keep the stone on the edge and off the flat. Do that, oil the blade afterward, and the pattern stays perfect through years of regular use.
Frequently Asked Questions
Can I use an electric sharpener on a Damascus knife? +
No. Electric pull-through sharpeners use fixed angles that don't match the geometry of Damascus blades, and their abrasive wheels scratch the patterned surface. The heat generated also softens the high-carbon layers in Damascus steel, permanently damaging the temper. Always use a whetstone.
What angle should I sharpen a Damascus knife at? +
Most Damascus knives, including all Louis Martin Custom Knives Damascus blades, are ground at 15° per side. Use the two-quarter method: raise the spine until two US quarters fit between it and the whetstone surface, which gives you approximately 13–15°.
Will sharpening remove the Damascus pattern? +
Sharpening the edge bevel will not harm the pattern at all. The pattern is on the flat of the blade, not the edge. The danger comes from grinding, polishing, or abrading the flat. If the pattern looks faded after heavy sharpening, a light ferric chloride re-etch will restore the contrast.
What grit whetstone should I start with? +
For routine sharpening of a Damascus knife with a slightly dull edge, start at 1000 grit. If the edge is chipped or needs reprofiling, begin at 400–600 grit. Always finish with 3000–6000 grit to refine the edge, then strop on leather to align the final burr.
How often should I sharpen my Damascus knife? +
Sharpen only when the knife fails the paper test, it can no longer slice cleanly through a sheet of printer paper. For daily maintenance, use a ceramic honing rod before every few uses to realign the edge without removing steel. Most home cooks sharpen a Damascus kitchen knife two to four times per year.